Inside the Workshop: How We Build a High-End Byzantine Chain
Share
1. Introduction
Most people only ever see the finished Byzantine chain: polished, glowing and perfectly draped around the neck. But the real story of a high-end chain happens long before the final polish. It’s in the metal choices, the wire gauges, the way each link is formed and how the structure is checked as the chain grows link by link.
In this article, we’ll take you inside our workshop and walk through how we build a high-end Byzantine chain from scratch, the way a serious piece of jewelry should be made.
2. Step 1 – Metal selection and alloy control
Every Byzantine chain starts with a decision about metal and alloy.
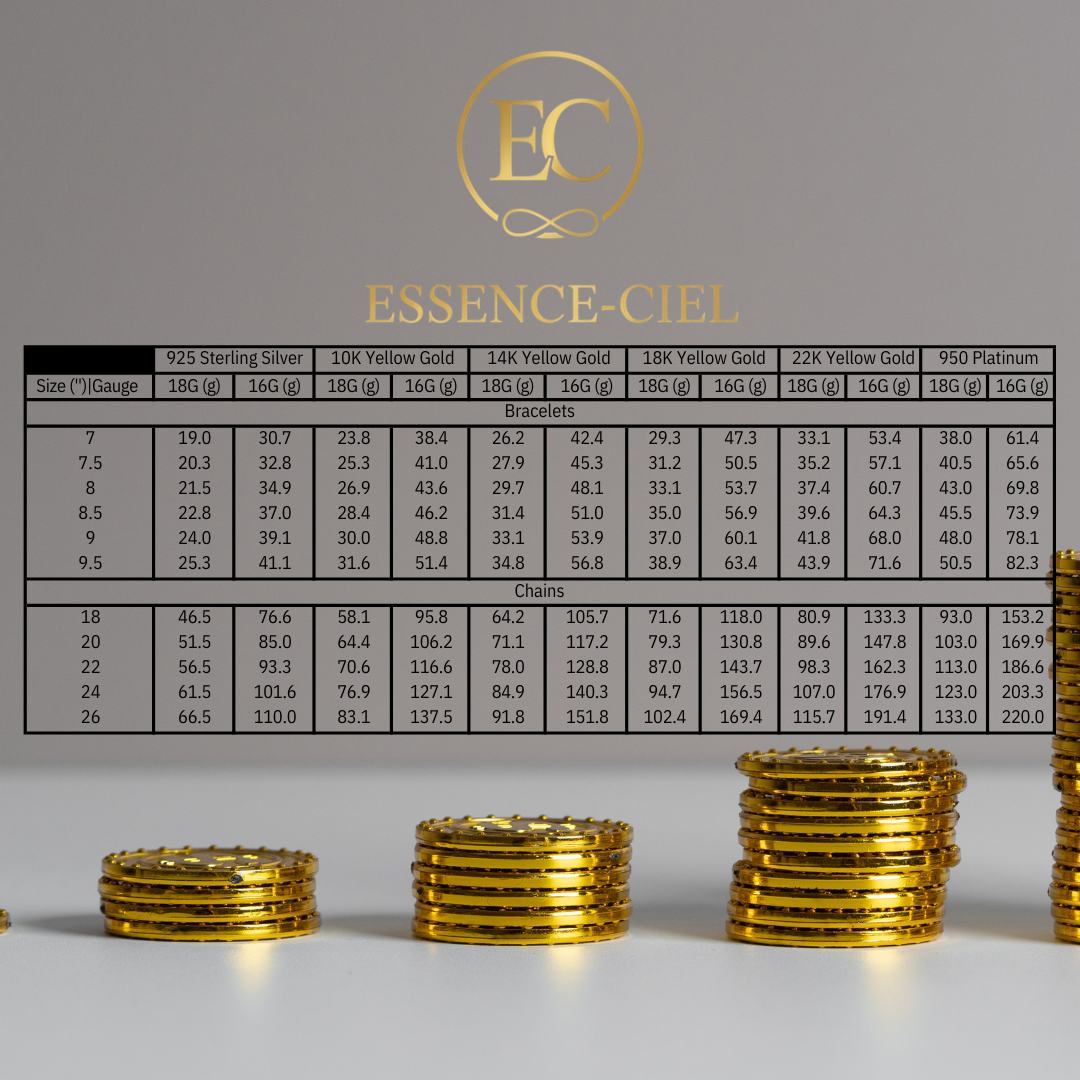
For our pieces, we work with:
- Sterling silver 925
- 10k, 14k and 18k gold
- Pt950 platinum
The choice isn’t just aesthetic. It affects:
- How the links behave when formed and assembled
- How the chain wears over time
- The final weight and feel on the neck
We use certified precious metals from reputable suppliers and controlled alloys designed for durability, comfort and color consistency. For clients who plan to wear their chain daily, we often recommend specific karats and alloys that balance hardness and visual richness.
3. Step 2 – Wire drawing and gauge choice
Once the metal is chosen, we move to wire drawing and gauge selection. This step defines the backbone of the chain.
- The wire is drawn to a precise diameter, which will determine the thickness and weight of the final chain.
- Different projects call for different gauges – a heavy legacy piece doesn’t use the same wire as a more discreet daily-wear chain.
Getting this step right is critical. Too thin, and the chain feels insubstantial. Too thick, and it becomes uncomfortable or visually unbalanced. We choose gauges that match the client’s neck size, desired presence and long-term wear expectations.
4. Step 3 – Forming and cutting the links
With the wire prepared, we begin forming the individual links using mandrels sized for the specific Byzantine pattern we want to achieve.
- The wire is coiled around the mandrel to create a tight, consistent spiral.
- Each coil is then cut into separate rings with clean, controlled cuts.
At this stage, precision matters. If the cuts are sloppy or inconsistent, the links won’t close properly, and the pattern will never feel tight or secure. We inspect the rings as we go to make sure they’re ready for assembly.
5. Step 4 – Assembling the Byzantine pattern
This is where the chain starts to look like a Byzantine chain.
- The individual rings are opened, woven into the correct pattern, and closed again.
- We build the chain section by section, constantly checking the geometry and tension.
A good Byzantine chain should:
- Flex smoothly without collapsing
- Hold its shape when you lay it down
- Show a clear, repeating pattern from end to end
This part of the process is slow and methodical. It’s where the difference between a mass-produced chain and a high-end handmade piece becomes obvious.
6. Step 5 – Soldering (if applicable) and structural checks
Depending on the design and metal, certain links may be soldered to lock the structure in place.
- Soldering is done with care to avoid flooding the pattern with excess metal.
- Joints are cleaned and refined so they don’t interrupt the visual flow of the chain.
After this, we perform structural checks:
- Gently stressing sections of the chain to ensure there are no weak points.
- Confirming that links don’t open under normal handling.
The goal is simple: a Byzantine chain that feels like a single, continuous object, not a fragile collection of rings.
7. Step 6 – Finishing, polishing and comfort control
Once the structure is locked in, we move to finishing and comfort. This is where a chain goes from “technically complete” to “pleasure to wear”.
- Edges are softened so they don’t scratch or catch on clothing.
- Surfaces are polished to the level appropriate for the metal and style – from bright polish to more controlled sheen.
- The clasp is fitted and finished to match the chain, both visually and mechanically.
We test the chain directly on the skin to make sure it:
- Moves smoothly
- Doesn’t pinch or pull
- Sits correctly on the neck or wrist without twisting
8. Step 7 – Weight, documentation and final inspection
Before a Byzantine chain leaves the workshop, we document it as if it were a small mechanical object.
- The chain is weighed on a precision scale.
- The final length, thickness and metal type are recorded.
- The overall structure and finishing are inspected one last time under proper lighting.
This information is then included with the piece so the client knows exactly what they own. For serious buyers, this documentation is important for insurance, resale and legacy planning.
9. Why this process matters for serious buyers
From the outside, two Byzantine chains can look similar in a photo. But the process behind them is what determines:
- How they feel in the hand
- How they sit on the body
- How they age over years of wear
A chain that’s rushed, underweight or poorly finished might look fine at first glance, but it won’t deliver the same experience or long-term confidence. For clients who see a Byzantine chain as an investment and a personal statement, the process is not a detail – it’s the whole point.
10. Conclusion
Building a high-end Byzantine chain is closer to precision craft than mass production. Every decision—from the alloy to the wire gauge, from the way each link is formed to how the final chain is documented—shows up in the way the piece feels and lives on the body.If you’re considering a serious Byzantine chain or bracelet and want to discuss metals, dimensions and weight in detail, we’re happy to walk you through the process step by step.
Explore our handmade Byzantine pieces:
View our Byzantine Chain
View our Byzantine bracelet